Sunday, November 8, 2009

How to Customize the System Tray in Windows 7

In Windows 7, the system tray is now called the Notification Area, which is just a fancy term for all those little icons at the bottom right of your taskbar. Just like you could customize the system tray in Windows XP, you can also customize the notification area in Windows 7.

There are two ways you can manage the notification area: either by dragging and dropping icons or by using the Control Panel settings.

What I like about Windows 7 is that it’s super easy to control which icons show in the notification area and which ones are hidden. By hidden, I mean that you have to first click on the small up arrow to see the hidden icons.

To show an icon in your system tray, click on the up arrow and then drag the icon you want into the notification area
.
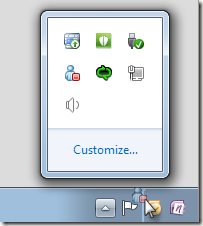
If you want to hide an icon, just drag the icon from the notification area and drop it anywhere off of the taskbar.
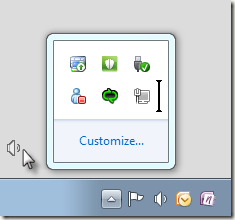

The second way to manage icons in the notification area is to click on the up arrow, then click on Customize. This will open the Notification Area Icons control panel item:

Here you can go through each icon and pick whether you want to see the icon and notifications, see only the notifications, or hide both the icon and any notifications that might come with it.

You can also click the Turn system icons on or off if you want to hide the Clock, Volume, or Network icons
.
Finally, if you check the Always show all icons and notifications on the taskbar, then nothing will ever be hidden and all icons will show no matter how wide they become.

If all your icons are messed up or too many things changed and you just want to go back to the defaults, click on the Restore default icon behaviors link.


That’s pretty much all the features of the notification area in Windows 7! If you have a question, post it in the comments! Enjoy!

How to customize the Firefox toolbar

In this post, I will talk about how to customize the Firefox toolbar. The toolbar is very flexible and can be modified in just about any way you can think of.

To get started customizing the Firefox toolbar, go to View, Toolbars and then choose Customize.

Now if you want to create your own custom toolbar in Firefox with your own buttons, go ahead and click on the Add New Toolbar button.

Go ahead and type in a name for your toolbar and click OK.

A new toolbar will appear below the main toolbar that will be totally blank. At this point, you can begin dragging icons from the Customize Toolbar dialog onto the new toolbar. Here I have added buttons for Downloads, Bookmarks, adding a new tab, and for other add-ons like Live HTTP Headers and Amazon S3.

Also, notice that the toolbar just shows the icons and not the text plus the icons are a little big in size. You can change both of those things by clicking on the drop down menu next to Show and checking the box Use Small Icons.

That’s about it! Note that when you install a new add-on, such as PageSpeed, which analyzes the performance of your website, you can add that button to your custom toolbar. Enjoy!

Source : Internet