Sunday, November 8, 2009

How to Customize the System Tray in Windows 7

In Windows 7, the system tray is now called the Notification Area, which is just a fancy term for all those little icons at the bottom right of your taskbar. Just like you could customize the system tray in Windows XP, you can also customize the notification area in Windows 7.

There are two ways you can manage the notification area: either by dragging and dropping icons or by using the Control Panel settings.

What I like about Windows 7 is that it’s super easy to control which icons show in the notification area and which ones are hidden. By hidden, I mean that you have to first click on the small up arrow to see the hidden icons.

To show an icon in your system tray, click on the up arrow and then drag the icon you want into the notification area
.
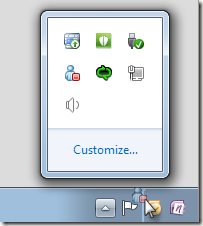
If you want to hide an icon, just drag the icon from the notification area and drop it anywhere off of the taskbar.
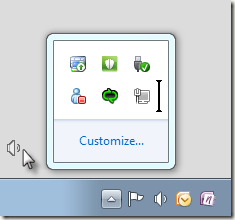

The second way to manage icons in the notification area is to click on the up arrow, then click on Customize. This will open the Notification Area Icons control panel item:

Here you can go through each icon and pick whether you want to see the icon and notifications, see only the notifications, or hide both the icon and any notifications that might come with it.

You can also click the Turn system icons on or off if you want to hide the Clock, Volume, or Network icons
.
Finally, if you check the Always show all icons and notifications on the taskbar, then nothing will ever be hidden and all icons will show no matter how wide they become.

If all your icons are messed up or too many things changed and you just want to go back to the defaults, click on the Restore default icon behaviors link.


That’s pretty much all the features of the notification area in Windows 7! If you have a question, post it in the comments! Enjoy!

How to customize the Firefox toolbar

In this post, I will talk about how to customize the Firefox toolbar. The toolbar is very flexible and can be modified in just about any way you can think of.

To get started customizing the Firefox toolbar, go to View, Toolbars and then choose Customize.

Now if you want to create your own custom toolbar in Firefox with your own buttons, go ahead and click on the Add New Toolbar button.

Go ahead and type in a name for your toolbar and click OK.

A new toolbar will appear below the main toolbar that will be totally blank. At this point, you can begin dragging icons from the Customize Toolbar dialog onto the new toolbar. Here I have added buttons for Downloads, Bookmarks, adding a new tab, and for other add-ons like Live HTTP Headers and Amazon S3.

Also, notice that the toolbar just shows the icons and not the text plus the icons are a little big in size. You can change both of those things by clicking on the drop down menu next to Show and checking the box Use Small Icons.

That’s about it! Note that when you install a new add-on, such as PageSpeed, which analyzes the performance of your website, you can add that button to your custom toolbar. Enjoy!

Source : Internet

Tuesday, November 3, 2009

How To: Install Windows 7/Vista From USB Drive

This method is very simple and you can use without any hassles. Needless to say that your motherboard should support USB Boot feature to make use of the bootable USB drive.


Requirements:

*USB Flash Drive (Minimum 4GB)
*Windows 7 or Vista installation files.

Follow the below steps to create bootable Windows 7/Vista USB drive using which you can install Windows 7/Vista easily.

1. Plug-in your USB flash drive to USB port and move all the contents from USB drive to a safe location on your system.

2. Open Command Prompt with admin rights. Use any of the below methods to open Command Prompt with admin rights.

*Type cmd in Start menu search box and hit Ctrl+ Shift+ Enter.
Or
*Go to Start menu > All programs > Accessories, right click on Command Prompt and select Run as administrator.

3. You need to know about the USB drive a little bit. Type in the following commands in the command prompt:

First type DISKPART and hit enter to see the below message.


Next type LIST DISK command and note down the Disk number (ex: Disk 1) of your USB flash drive. In the below screenshot my Flash Drive Disk no is Disk 1.

4. Next type all the below commands one by one. Here I assume that your disk drive no is “Disk 1”.If you have Disk 2 as your USB flash drive then use Disk 2.Refer the above step to confirm it.

So below are the commands you need to type and execute one by one:

SELECT DISK 1
CLEAN
CREATE PARTITION PRIMARY
SELECT PARTITION 1
ACTIVE
FORMAT FS=NTFS
(Format process may take few seconds)
ASSIGN
EXIT

Don’t close the command prompt as we need to execute one more command at the next step. Just minimize it.


5. Next insert your Windows7/Vista DVD into the optical drive and check the drive letter of the DVD drive. In this guide I will assume that your DVD drive letter is “D” and USB drive letter is “H” (open my computer to know about it).

6. Maximize the minimized Command Prompt in the 4th step.Type the following command now:

D:CD BOOT and hit enter.Where “D” is your DVD drive letter.
CD BOOT and hit enter to see the below message.

7. Type another command given below to update the USB drive with BOOTMGR compatible code.

BOOTSECT.EXE /NT60 H:


Where “H” is your USB drive letter. Once you enter the above command you will see the below message.

8. Copy your Windows 7/Vista DVD contents to the USB flash drive.

9. Your USB drive is ready to boot and install Windows 7/Vista. Only thing you need to change the boot priority at the BIOS to USB from the HDD or CD ROM drive. I won’t explain it as it’s just the matter the changing the boot priority or enabling the USB boot option in the BIOS.

Note: If you are not able to boot after following this guide means you haven’t set the BIOS priority to USB. If you got any problem in following this guide feel free to ask questions by leaving comment.

How To Create Live USB/CD/DVD OF Vista/XP

Required Software(s) and other things

1.Microsoft Windows XP/Vista CD/DVD
2.Two GB or more capacity pen drive
3.Net connection( No need to worry for speed connection). It’s matter of few MBs
4.CD/DVD to make live CD/DVD.
5.WinBuild software, using which we are going to create live CD.

*Download the WinBuild Here(It’s just 834KBs!!!)
*Extract the file and copy it to a ‘New Folder’(Recommended requierd space is 2GB)
*Unpack and Run Winbuilder(no installation required!!!)
*On your mark, get set, go…

1.The first screen of WinBuilder gives you the brief explanation on how to use this magnificent program. You can read all the necessary instructions here. Press on the “Download” tab to proceed further.


2.This is the download screen of WinBuilder were you need to select required tools, drivers and other crusial applications required for a live CD/USB. As you can see in the screen shot you need to select one option from the three(’Recommended’ or ‘Complete’ or ‘Minimum’) options in the drop down menu. You can further remove from the list which shows just below these three options.

3.After selecting required option,press ‘Download’ button which is located just below the left side pane. Time required to download depends on what optins you have selected in the left side pane just before. Download size is around 40 MB.


4.The next one is ‘Scripts’ tab.Once again you will see a list of options on the left pane of the wizard. Here, check the ‘VistaPE MUltiboot’/XP option and expand the tree further.

5.Expand the tree named ‘Applications’.In this option, you will see all the available sections of applications,which you can add to your live Vista/XP CD/USB.

6.Next screen is ‘Finalize’ option. It might take few minutes to build the live media.If you like to create live CD select the ‘Create ISO’ option and provide the label for the CD.


7.Suppose, if you planning to make a bootable USB drive, then select the ‘Copy to USB device’ option.

8.Click on the ‘Paths’ tab, and provide the path of the USB drive, which has the Windows Vista/XP DVD in the source directory filed and click on the ‘Play’ button.


9.Extraction process takes place. Wait for a minute.


Wait for few seconds to see you. Burn the ISO to get your dream live Windows

10.Now,your bootable USB/CD is ready.

11.Insert the CD/USB and kick start the your own windows live!!!

SOURSE : From Internet

How to make a portable software

Make Your software as portable by using Thinstall.This is a software by which you get your software as portable verson.Just you have to download thinstall from any website by searching google.Now open the thinstall software and click next.


When you see this Screen please minimize it.Now install your necessary Software which make up you portable verson.Then click Maximize .


When you see this Screen please select USB Flash/ option and click next.


Select no compression and click next.


After clicking finish you are able to create your portable software.Now go to save location and click bin folder and click your software icon.
You get your portable software.Just copy bin folder in another computer and try your portable software.

Monday, November 2, 2009

How to make an Icon

Today we will learn How to make an Icon as you need.You will create your own icon from picture or drawing anything.So lets go.......

We will make Icon By using IconFX.

To create an icon using IcoFX follow these steps:

1. Start IcoFX.

2. Create a new empty icon using the "File/New..." menu item.

3. On the New Image dialog select the size 256x256 and the data type True Color + Alpha channel


4. Draw your icon.

5. Your icon contains only one image format. Use the "Icon/Create Windows Icon From Image..." menu item to add all the needed image formats to the icon. The default settings on this dialog will do in most cases.


Use the "Icon/Create Macintosh Icon From Image..." menu item if you would like to create a Macintosh icon.

7. If you would like to create Windows Vista compatible icons with PNG compression then make sure that there is a 256x256 sized image in your icon and that the "Options/Preferences/Options/Compress 256x256 images for Windows Vista" option is checked.

6. Save the icon using the "File/Save As..." menu item. On the save dialog choose the desired output format in the "Save as type" combo box.

Download IconFX.... Click here

OK , Make your own Icon.Thanks.